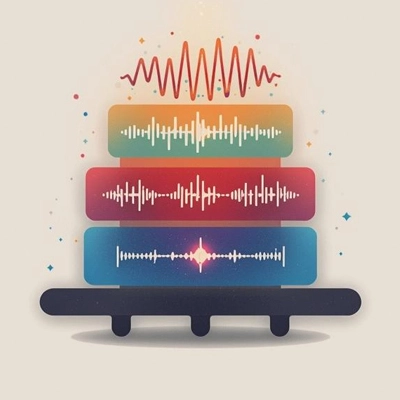
🔊 Your Kick Hits. But Does It Hit HARD?
You've spent three hours tweaking that kick drum. EQ'd it. Compressed it. Added saturation. Parallel processed it. And it still sounds... underwhelming.
It's got punch, sure. But it doesn't have that chest-rattling weight you hear in professional tracks. It doesn't occupy the full frequency spectrum from sub-bass to bright attack. It sounds like a single element, not an experience.
Here's the truth that changed everything for me: The drums you admire in commercial productions? They're almost never single samples.
That kick drum that feels like it's physically pushing air through your speakers? It's probably three or four sounds carefully stacked together. The snare that snaps with authority while also having body and depth? Layered. Those hi-hats that shimmer with complexity and movement? You guessed it—multiple elements working as one.
Drum layering isn't cheating. It's not a crutch for bad samples. It's a fundamental production technique that separates bedroom demos from radio-ready tracks.
And the best part? Once you understand the principles, layering becomes intuitive. You'll know exactly which elements to stack, how to align them, and how to process them so they behave like a single, cohesive sound.
In this guide, I'm going to show you how to layer drums in both Maschine MK3 and Ableton Live—not just the mechanical steps, but the why behind every decision. By the end, you'll be building drums that compete with anything on Spotify.
What You'll Learn in This Guide
- Why Single Samples Always Fall Short
- The Science Behind Powerful Layered Drums
- Setting Up Your Layering Workflow
- The Three-Layer Kick Formula
- Building Snares That Cut Through Anything
- Layering Hi-Hats and Percussion for Depth
- Phase Alignment: The Make-or-Break Detail
- Processing Layered Drums Like a Pro
- Common Layering Mistakes (And How to Avoid Them)
💔 Why Single Samples Always Fall Short
Before we talk solutions, let's understand the problem. Why can't a single sample give you everything you need?
The Physics Problem
Real drums produce incredibly complex sounds across the entire frequency spectrum. An acoustic kick drum generates sub-bass frequencies from the fundamental resonance, midrange from the beater impact, and high-frequency content from the skin's initial attack.
When you record that sound and compress it into a single WAV file, something gets lost. Maybe the low end is perfect but the attack is weak. Maybe the transient is crisp but the body lacks weight. Sample libraries optimize for one characteristic at the expense of others.
The Context Problem
That "perfect" kick you found? It was recorded in a specific context—specific tuning, specific mic placement, specific room. When you drop it into YOUR track with YOUR bass line and YOUR arrangement, it might not work at all.
The kick that sounds massive in isolation might disappear when your 808 bass comes in. The snare with beautiful reverb tail might turn muddy in a dense mix. Single samples don't adapt—they are what they are.
The Frequency Gap Problem
Here's something most producers don't realize: professional-sounding drums occupy specific frequency zones with intention. Your kick needs controlled sub energy (20-60Hz), punchy low-mids (60-150Hz), and crisp attack (3-8kHz). But most single samples emphasize ONE of these zones while neglecting others.
Layering isn't about making sounds louder—it's about filling the frequency spectrum strategically so your drums have complete tonal balance.
This is why your drums sound thin even after heavy processing. You're trying to force a single sample to cover multiple frequency roles simultaneously. It's like asking a bass guitar to also play lead melody—technically possible, but not optimal.
🧬 The Science Behind Powerful Layered Drums
Layering works because it exploits how human hearing processes complex sounds. We don't hear individual waveforms—we hear the sum of all frequencies hitting our ears.
The Frequency Stacking Principle
When you layer drums correctly, each element occupies a distinct frequency zone:
Layer 1 (Sub): Handles 20-60Hz, providing weight and physical impact
Layer 2 (Body): Occupies 60-500Hz, giving the drum presence and character
Layer 3 (Attack): Lives in 2-8kHz, creating definition and transient clarity
Together, these layers create a sound that's fuller than any single sample could be. The sub provides the chest-thump feeling. The body gives tonal character. The attack ensures the drum cuts through busy mixes.

The Psychoacoustic Advantage
There's another benefit beyond frequency coverage: complexity creates interest. Our brains are wired to notice rich, multifaceted sounds over simple ones. A layered kick with multiple harmonic components sounds more "expensive" and "professional" even if listeners can't articulate why.
This is why synthesized 808s get layered with acoustic kicks. Why electronic snares get blended with real drum samples. The combination creates harmonic complexity that engages listeners on a subconscious level.
The Dimension Factor
Layering also adds stereo width and spatial depth. Different samples recorded in different spaces create a sense of dimension. Your kick might have mono sub but stereo room information. Your snare might have centered attack but wide reverb tail. These dimensional variations make drums feel three-dimensional rather than flat.
⚙️ Setting Up Your Layering Workflow
The mechanics of layering differ between Maschine and Ableton, but the concepts remain identical. Let's set up efficient workflows in both.
Layering in Maschine MK3
Maschine's Sound-Group-Master hierarchy makes layering elegant and organized. Here is one approach that gives you more control and flexibility:
Multiple Sounds on Different Pads
This is the most flexible method and what I recommend for most situations.
- Create a dedicated Group for your kick (or snare, or whatever you're layering)
- Load each layer element onto separate pads within that Group
- Set all pads to the same Link Group so one trigger fires all layers
- Adjust individual volumes at the Sound level for precise balance
- Process each layer independently before group-level processing
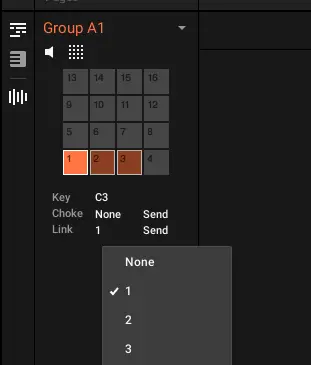
The advantage? You can mute/solo individual layers during mixing, adjust their timing independently for creative phasing, and save the complete layered sound as a Group preset.
Layering in Ableton Live
Ableton offers multiple approaches, each with advantages:
Method 1: Drum Rack
The most common and intuitive method:
- Create a new Drum Rack
- Create instrument rack in to pad slot
- Drop each layer sample into the same instrument rack
- Each sample automatically gets its own device chain
- Adjust volumes using the Drum Rack chain volume controls
- Process individually using devices on each chain
- Add group processing after the Drum Rack

Drum Rack is perfect becawuse you get individual control while maintaining the single-pad-trigger workflow. Plus, you can use macros to control all layers simultaneously.
Method 2: Separate MIDI Tracks
For maximum flexibility and processing options:
- Create separate MIDI tracks for each layer
- Load one sample per track
- Write identical MIDI patterns across tracks (or copy-paste)
- Route all tracks to a single return or group track
- Process individually at track level, collectively at group level
This method is overkill for most situations, but invaluable when you need completely different processing chains or complex automation on individual layers.
🎯 The Three-Layer Kick Formula
Let's get practical. This is my go-to formula for massive kick drums that translate on any system.
Layer 1: The Sub Foundation
This layer's sole job is providing controlled low-end weight. You want pure, focused energy between 30-60Hz with minimal harmonic content above that.
What to use: 808 samples, sine wave kicks, or build from scratch with minimal body and maximum sub presence.
Processing:
- High-pass filter at 25-30Hz to remove sub-sonic rumble
- Low-pass filter at 80-120Hz to remove upper harmonics
- Light compression (2-3dB GR) to control dynamics
- Check in mono—sub layers must be perfectly mono
Tuning critical: Tune your sub layer to match your track's key. An E sub kick in a track in A minor creates harmonic clashing that muddies everything. Tune it to A, and suddenly your mix locks together.
Layer 2: The Body and Character
This is where tonal personality lives. The frequency range between 80-500Hz determines whether your kick feels warm, aggressive, punchy, or soft.
What to use: Acoustic kick samples with good midrange presence, processed electronic kicks, or synthesized kicks with prominent body sections.
Processing:
- High-pass filter at 60-80Hz to avoid fighting the sub layer
- EQ boost around 100-150Hz for punch
- Cut around 300-400Hz if it sounds boxy
- Moderate compression (4-6dB GR) to glue it together
- Saturation or subtle distortion for harmonic richness
This layer can have stereo width from room mics, but keep the fundamental mono-centered.
Layer 3: The Attack Definition
This is the brightness and snap that makes your kick audible on laptop speakers and earbuds. It's the transient that cuts through dense mixes.
What to use: Short click samples, beater impact sounds, or just the first 50-100ms of a bright acoustic kick.
Processing:
- High-pass filter at 2-3kHz, keeping only the attack transient
- Very short decay (50-100ms maximum)
- Transient shaper to emphasize attack, reduce sustain
- Minimal compression to preserve transient energy
- Subtle delay (5-20ms) if it needs to sit behind the body layer
This layer should be SUBTLE. Too much click makes your kick sound like a basketball. You want just enough to add definition.
Balancing the Three Layers
Here's the typical level relationship:
- Sub layer: Loudest (reference level)
- Body layer: 3-6dB quieter than sub
- Attack layer: 6-12dB quieter than sub
These are starting points. The actual balance depends on your genre and arrangement. Techno might have the sub and body at equal levels. Pop might have body slightly louder than sub for clarity.
The key is checking your balance on multiple systems. If the kick disappears on phone speakers, bring up the attack layer. If it sounds thin and clicky, bring up the sub and body.
🥁 Building Snares That Cut Through Anything
Snares are more complex than kicks because they combine tonal elements (the drum shell) with noisy elements (snare wires). Effective layering respects this duality.
The Two-Part Snare Approach
Layer 1: The Body and Tone
This determines the fundamental character—is it a tight piccolo snare or a fat backbeat snare?
What to use: Clean acoustic snare samples, synthesized snare tones, or [Maschine Drumsynth snares](/building-drums-maschine-from-scratch) with prominent tone sections.
Processing:
- High-pass at 100-150Hz to keep low-mids clean
- Boost around 200-300Hz for body and warmth
- Cut around 400-600Hz if it sounds boxy or honky
- Moderate compression (5-8dB GR) for consistent tone
Layer 2: The Crack and Sizzle
This is the snare wire rattle and the bright attack that helps it cut through guitars and vocals.
What to use: Bright, crispy snare samples with prominent wire sound, noise-based synthesis, or just the high-frequency content of an acoustic snare.
Processing:
- High-pass at 2-4kHz, keeping only the brightness
- Exciter or saturation to add sizzle
- Very light compression to preserve transient snap
- Subtle reverb on THIS layer only for space without washing out the body
The Optional Third Layer: Electronic Enhancement
For modern genres (trap, future bass, pop), adding a third synthetic layer creates hybrid character:
What to use: 909 snares, FM snares, noise bursts, or laser/zap sounds from synths.
Processing:
- Shape with transient designer for exaggerated attack
- Pitch shift for tonal interest
- Distortion for aggression
- Keep MUCH quieter than acoustic layers—it's seasoning, not the main dish
This layer is what makes your snare instantly recognizable as "modern" versus "classic." Use it intentionally based on your aesthetic goals.
🎩 Layering Hi-Hats and Percussion for Depth
Hi-hats and percussion benefit from layering differently than kicks and snares. Here, you're building complexity and movement rather than power and punch.
The Complexity Approach
Layer 2-3 different hi-hat samples with slight timing and tonal variations. This creates the illusion of a real drummer with natural inconsistency.
Layer 1: Primary Hat
- Your main hi-hat sound with strong fundamental character
- Keep this consistent and locked to the grid
- This is your rhythmic anchor
Layer 2: Tonal Variation
- A brighter or darker hat for frequency complexity
- Offset timing by 1-5ms for subtle "humanization"
- Lower volume than primary (6-10dB quieter)
Layer 3: Texture and Shimmer
- Noise elements, shakers, or foley sounds
- Adds stereo width and air
- Process with reverb for dimension
- Very subtle—barely audible in isolation
The Movement Technique
Automate which layers are playing throughout your track. Verse might have just Layer 1. Pre-chorus adds Layer 2. Chorus brings in all three. This creates dynamic interest without changing the fundamental rhythm.
In Maschine, use Scene automation. In Ableton, use clip automation or track mutes.
⚡ Phase Alignment: The Make-or-Break Detail
Here's where most producers fail at layering: they ignore phase relationships. When multiple samples play simultaneously, their waveforms either reinforce or cancel each other.
What Phase Cancellation Sounds Like
Ever layered two kick drums and somehow ended up with LESS low end? That's phase cancellation. The waveforms are perfectly out of sync, creating destructive interference that reduces rather than amplifies energy.
The Visual Check
Zoom into your waveforms at the sample level. Are the initial transients aligned? If one sample peaks upward while another peaks downward at the same moment, you have phase issues.
In Maschine:
- Use the Sample Edit page to zoom into waveform details
- Adjust sample start points so transients align visually
- Use the Phase Invert function on individual sounds if needed
In Ableton:
- Zoom into clip waveforms
- Nudge samples using the sample offset control in Simpler/Sampler
- Use Utility's phase invert function to flip problematic layers
The Listening Check
Technology is great, but your ears are the final judge. Solo your low end (everything below 200Hz) and flip the phase on one layer. Does the low end get louder or quieter? Whichever position gives you MORE energy is the correct one.
Do this for every layer combination. It takes 30 seconds and prevents hours of frustration wondering why your layered kick sounds thin.
🎚️ Processing Layered Drums Like a Pro
Once your layers are balanced and phase-aligned, processing makes them behave as a single, cohesive unit.
Individual Layer Processing
Process each layer BEFORE combining them:
EQ: Use surgical cuts to remove resonances and overlapping frequencies. High-pass aggressively to ensure each layer stays in its designated frequency zone.
Compression: Control dynamics of individual layers. The sub layer might need tight compression for consistency. The attack layer might need minimal compression to preserve transients.
Saturation: Add harmonic richness to individual layers. This works especially well on body layers to add warmth and character.
Group-Level Processing
After individual processing, treat the combined layers as one instrument:
Glue Compression: Light compression (2-4dB GR) with slow attack and medium release. This "glues" the layers together so they move as one unit. The Maschine Compressor or Ableton's Glue Compressor excel at this.
If you want to dive deeper into compression techniques, check out my guide on parallel compression
Final EQ: Broad, musical EQ moves to shape the complete sound. This is where you make final adjustments for mix context—cutting lows if your bass is heavy, boosting highs for brightness, etc.
Transient Shaping: A transient designer at group level can emphasize or soften the combined attack. Useful when layers have slightly mismatched transient envelopes.
Reverb and Space: Apply spatial effects AFTER layering. Reverberating individual layers before combining them creates phase complexity that's hard to control. Group-level reverb is cleaner and more predictable.
🚫 Common Layering Mistakes (And How to Avoid Them)
After years of producing and teaching, I see the same errors repeatedly. Avoid these and you're ahead of 90% of producers.
Mistake 1: Too Many Layers
More isn't always better. I've heard kick drums with seven layers that sound worse than well-crafted two-layer combinations. Each additional layer adds complexity, phase issues, and processing challenges.
The fix: Start with 2-3 layers maximum. Only add more if you can articulate exactly what frequency or character is missing.
Mistake 2: Identical Frequency Content
Layering two samples that occupy the same frequencies doesn't create fullness—it creates volume and phase problems.
The fix: Before adding a layer, analyze what frequency range it fills. If it overlaps significantly with existing layers, EQ it differently or choose a different sample.
Mistake 3: Neglecting Mono Compatibility
Your layered kick sounds huge in stereo but disappears in mono (where most people actually listen on phones and smart speakers).
The fix: Keep low-end layers (sub and body) completely mono. Only high-frequency elements (attack, room ambience) can have stereo width. Always check your mix in mono before finalizing.
Mistake 4: Over-Processing Individual Layers
Adding heavy reverb, delay, or distortion to individual layers before combining them creates a muddy, unclear result.
The fix: Keep individual layer processing minimal and surgical (EQ, compression). Save creative effects for group-level processing after layers are combined.
Mistake 5: Not Considering Velocity Layers
Using the same layering balance regardless of hit velocity makes patterns sound static and unnatural.
The fix: If your workflow supports it, create velocity-dependent layer balances. Soft hits might use just the body layer. Medium hits add sub. Hard hits bring in the attack layer too. This creates natural dynamic response.
Mistake 6: Ignoring the Mix Context
Layering drums in isolation without considering your bass line, pads, and other elements leads to frequency masking and mix confusion.
The fix: Layer your drums while listening to at least a rough arrangement. If your bass already occupies 40-80Hz, your kick's sub layer should be tuned differently or reduced in volume. Context determines everything.
🎼 The Layering Mindset Shift
Once you internalize layering as a fundamental production technique rather than an occasional trick, your drums will never sound the same.
You'll stop searching for "the perfect sample" because you understand that perfection comes from combination, not discovery. You'll start analyzing professional productions differently, hearing the individual elements within seemingly simple drum sounds.
But here's what really changes: you'll develop sonic signatures that define your productions.
Your kick drum formula—the specific samples you combine, the frequency splits you use, the processing chain you apply—becomes part of your sound. Listeners might not consciously notice, but they'll recognize your tracks because the drums have YOUR fingerprint.
This is the difference between producers who sound like everyone else and producers who sound like themselves.
And the best part? Layering isn't limited to drums. The principles apply to bass, synths, vocals—any element where you need fuller frequency coverage and harmonic complexity. Master drum layering, and you've learned a technique that elevates every aspect of your productions.
So stop searching for better samples. Start building better combinations. Your drum library doesn't need expansion—your layering skills do.
Open up Maschine or Ableton. Load three kick drums onto different pads. Start tweaking. Start listening. Start creating sounds that are completely, unmistakably yours.
Your mix has been waiting for drums that fill every frequency with intention.
Stay sharp. Stay layered.
— ToneSharp


